Databases and JDBC

Practice for Week 5

Create a new project called Week5:

  1. In the "Java Web" category choose project of type "Web Application"
  2. Named Week5
  3. Using GlassFish Server
  4. Using the JavaServer Faces framework

After the project is created, don't forget to right click on Libraries and add the Java EE 7 API Library to ensure that JavaServer Faces works properly.

Please note that GlassFish 4.1.1 has a bug that prevents you from creating JDBC resources with the user interface. The best way to solve this problem is to upgrade to Payara. Full details can be found in the Hints.

For this lab exercise, we will use Java DB.

We first configure the database for use.

Go to the services tab, right click on Java DB and create a database.

New database

Name the database aip and set the username and password both to aip.

New database details

Test the Connection

Add an SQL file to your project:

  1. Return to your project (e.g., by selecting the Projects tab)
  2. Create a new file using File... New File...
  3. In the "Other" category, add a new file of type "SQL file"
  4. Name the file create_db (i.e., this creates a file named create_db.sql).

The SQL file will not show up in the "Projects" tab. However, you can see it if you switch to the "Files" tab.

To test your connection, enter this simple SQL query that gets all the database tables in the system:

select tablename from sys.systables;

Click on the "Run SQL" button to execute the file. It may ask which database to use. Select the database you just created: "jdbc:derby://locahost:1527/aip [aip on AIP]"

The result of the query should be a list of tables/views in the database. Even though you have not created any tables yourself, the database automatically creates metadata views. By querying these views, you can discover the structure of the database.

Experiment with SQL

If you would like to practice your SQL, you may use this file to experiment.

Can you create a table? Query a table? Insert data? Drop a table? Update a row?

Modify create_db.sql so that it contains SQL statements to create a new table. Name the table "account" (without the quotes). Ensure that it has (at least) the following attributes:

  • Username
  • Password
  • Full Name
  • Email
  • Date of Birth

Using the same SQL window, insert some sample data into your SQL file.

Use an SQL "select" query to check that the data has been added to the table.

Hints

You may like to also create a drop_db.sql file so that you can delete the database when you want to make changes to the schema.

Your create table statement might look something like this:

-- User details
create table account (
    username varchar(255) not null primary key,
    password varchar(255),
    fullname varchar(255) not null,
    email varchar(255) not null,
    dob date not null
);

You can include "select" statements in your SQL file (or in another SQL file). The results will be shown in NetBeans.

Strictly speaking, it isn't necessary to use SQL to create a database schema. It is possible to create tables and insert rows using the NetBeans user interface (in the "Services" tab like when you first created the database). However, SQL files are easier to manage, check, and share with other users. For this exercise, you should create and populate your tables using SQL.

One way to enter dates in your sample data is using the JDBC escape syntax: {d '1999-12-31'}

Here's how to insert one record:

insert into account (username, password, fullname, email, dob) values
    ('cbrady', 'password', 'Carol Brady', 'cbrady@example.com', {d '1934-02-14'});

The full Java DB / Derby SQL manual can be found here: https://db.apache.org/derby/docs/10.10/ref/index.html

Java DB supports these types:

  • BIGINT
  • BLOB
  • BOOLEAN
  • CHAR
  • CHAR FOR BIT DATA
  • CLOB
  • DATE
  • DECIMAL
  • DOUBLE
  • DOUBLE PRECISION
  • FLOAT
  • INTEGER
  • LONG VARCHAR
  • LONG VARCHAR FOR BIT DATA
  • NUMERIC
  • REAL
  • SMALLINT
  • TIME
  • TIMESTAMP
  • VARCHAR
  • VARCHAR FOR BIT DATA
  • XML

In this exercise, you will query the database table that you just created.

Create a JavaServer Faces file named "accounts" (i.e., accounts.xhtml).

Create an empty backing bean called AccountController in a package named au.edu.uts.aip.accounts:

@Named
@RequestScoped
public class AccountController {

}

Hint

Java has two annotations named RequestScoped:

  • javax.enterprise.context.RequestScoped
  • javax.faces.bean.RequestScoped

You'll need an import statement to be able to use Named and RequestScoped.

It may seem counter-intuitive, but you should always use the one in the javax.enterprise.context package (not the one in javax.faces). There is a technical reason for this. There are actually two ways to create backing beans: an older approach built into Faces and a more modern approach based on Java's "CDI". The javax.enterprise package is used by the more modern approach. The other package is used by the older method.

Create an Action

Create a method in the AccountController named listUsers (it should take no parameters and return void). Add a h:commandButton to the JavaServer Faces page (accounts.xhtml) - you'll also need to put it inside a h:form. Configure the action of the commandButton so that when it is clicked, it will call the listUsers method.

You're not doing anything special with JavaServer Faces. The command button is only being used to call the listUsers method. The listUsers method will output information to the server logs (nothing interesting will happen in the web-based user interface). Later on in this lab session, you will show the results directly in JavaServer Faces.

Perform an SQL Query

Now, using the lecture notes and other references, modify the listUsers method so that it will output your database to the server log.

The Server log is the text that appears in the "GlassFish 4.1.1 Server" tab below:

Server log

After modifying the listUsers method and then clicking on the command button, your server log might contain output such as:

Info:   Loading application [Week5] at [/Week5]
Info:   Week5 was successfully deployed in 827 milliseconds.
Info:   The accounts table contains:
Info:   username = cbrady, password = password, fullname = Carol Brady, email = cbrady@example.com, dob = 1934-02-14
Info:   username = mbrady, password = qwerty, fullname = Mike Brady, email = mbrady@example.com, dob = 1932-10-19
Info:   username = anelson, password = 123456, fullname = Alice Nelson, email = anelson@example.com, dob = 1926-05-05
Info:   username = sfranklin, password = iloveyou, fullname = Sam Franklin, email = sfranklin@example.com, dob = 1923-02-18
Info:   End of accounts table.

(The first two lines are generated by GlassFish. The rest of the lines are what you will output yourself.)

Hints

There are two ways to output to the server log:

The easy way:

System.out.println("This will be written to the log");

The more advanced way:

Logger log = Logger.getLogger(this.getClass().getName());
log.info("This will be written to the log");

In this exercise, create the connection using JDBC and the database connection string directly:

Connection conn = DriverManager.getConnection(....);

Reflect

How could the code be improved?

In this exercise, we will configure and use container-managed connection pooling.

Configure GlassFish

The GlassFish application server can be configured using XML files or the web-based Domain Administration Console.

You'll find an option to launch the GlassFish Server Administration Console in the Services tab of NetBeans. If a username/password is required the default username is admin and the password is blank.

Start admin console

In the menu, locate "Resources/JDBC/JDBC Connection Pools" and create a new connection pool.

New pool

Call it "AIPPool" and use the image below as a guide to configuring the pool.

New pool Step 1

Select the datasource classname "org.apache.derby.jdbc.ClientDataSource40". Before clicking Finish, scroll down the page.

New pool Step 2

At the bottom of the same page, remove all the "Additional Properties" except for: User, DatabaseName, Password, ServerName and PortNumber.

Additional properties

Configure the properties as depicted in the image below.

Property settings

Click "Finish" to create the pool.

You can then test the confguration by first reopening the Connection Pool...

Property settings

Then click on "Ping". This will do a quick test to make sure that the connection works. Your connection pool is set up correctly if "Ping Succeeded" appears.

Property settings

Now that you have created a connection pool, you need to create a resource so that you can use it from within your code.

In the menu, locate "Resources/JDBC/JDBC Resources". Create a new JDBC resource.

New JDBC resource

Use "jdbc/aip" (without the quotes) as the JNDI Name. Select AIPPool as the Pool Name.

JDBC resource name

Use the JDBC Connection Pool Resource

Now, modify your Java code so that it uses the JNDI resource.

Hints

Use the following code to get a datasource:

DataSource ds = (DataSource)InitialContext.doLookup("jdbc/aip");

The DataSource can be used to create new connections:

Connection conn = ds.getConnection();

In this activity, you will create a Data Access Object.

Create a two Java classes in the package au.edu.uts.aip.accounts:

  • AccountDAO
  • AccountDTO

Data Transfer Object

Implement the DTO as a simple Java Bean which has properties (i.e., get and set methods) corresponding to each attribute in your account table.

Data Access Object

Implement a DAO to create and store and retrieve data from the database.

For the time being, you do not need to implement a full DAO. Just implement the following two methods:

public AccountDTO find(String username) {
    // your code goes here
}

public ArrayList<AccountDTO> findAll() {
    // your code goes here
}

Hints

All of your SQL code should be inside the DAO.

An ArrayList is an array that automatically grows in size. You can create and fill an ArrayList with data using the following code:

ArrayList<AccountDTO> result = new ArrayList<>();
AccountDTO account1 = new AccountDTO();
AccountDTO account2 = new AccountDTO();
result.add(account1);
result.add(account2);

You might use the ArrayList in the findAll() method of your DAO.

Test your Data Access Object

Update the command in your AccountController to use the DAO instead of JDBC.

Hints

You can iterate over an ArrayList using code such as the following:

AccountDAO accountDAO = new AccountDAO();
ArrayList<AccountDTO> accounts = accountDAO.findAll();
for (AccountDTO account : accounts) {
  // do something with the DTO
}

Show the Accounts using JavaServer Faces

Finally, you can now show the accounts on the JavaServer Faces page, rather than in the server log.

Hints

You can look at your solution from Week 4. The class WaitingListDatabase is similar to a DAO (except that WaitingListDatabase used static methods and you should use instance methods on a DAO).

To access the list of accounts from your JSF page, you will need to create a property on your controller. To do this, create a get method in the AccountController class. For example:

public ArrayList<AccountDTO> getAllAccounts() {
  // your code goes here
}

At the end of the previous exercise, you created a simple tabular view of accounts in the system. That might be used by an administrator to see the accounts in the system.

In this exercise, we will now create a login form that uses the database.

First create a JSF page named login (i.e., login.xhtml), and a page named welcome (i.e., welcome.xhtml).

We will continue using the AccountController class as our backing bean.

To the controller, add a method called login (we'll modify it later):

public String login() {
  return null;
}

To the controller, add properties for the username and password form:

private String username;
private String password;

public String getUsername() {
  return username;
}

public void setUsername(String username) {
  this.username = username;
}

public String getPassword() {
  return password;
}

public void setPassword(String password) {
  this.password = password;
}

If you wish, you could instead do the same thing by using the AccountDTO as a model for JavaServer Faces (i.e., public AccountDTO getAccount());

Now, create a login form using JSF and implement the login method so that if a correct username/password is entered, the user is directed to the welcome page.

Hints

In your JSF page you could use h:inputText (for the username), h:inputSecret (for the password) and h:commandButton (for the action).

One way to implement login would be:

  1. Create a new instance of the DAO
  2. Use the DAO to retrieve an instance of the DTO that corresponds to the user (search by username).
  3. Check the password is correct.
  4. Redirect to "welcome" if the login is successful.

To compare two strings in Java, use the equals method:

String a = "First string";
String b = "Second string";
if (a.equals(b)) { 
   // This runs if a is the same as b
}

Comparing Strings using == does not always work (more information).

You do not need to show an error message. However, an advanced technique is to use the JSF error messages feature:

FacesContext.getCurrentInstance().addMessage(null, new FacesMessage("Bad username or password"));

Use a <h:messages/> tag on your login.xhtml file to tell JSF where in the HTML the error message should be displayed.

You have implemented your own login system.

Unfortunately, it isn't particularly secure. A user could simply guess "welcome.xhtml" to bypass the password.

You could improve the security by adding additional checks on each JSF page (e.g., using a <f:viewAction> to authenticate the user on each request).

A better approach is to use container-managed security. Container-managed security is a feature of the application server. It looks after logins and ensures that secure pages can only be accessed by authenticated users.

A JDBCRealm can be used to do user authentication via a database. Configuration is a tedious process but not difficult.

Set Up Views

First, the JDBCRealm needs to use two database tables:

  1. A user table, with a username column and a password column. The table is used to look up the user's password by username.
  2. A group table, with a username column and a group name column. The table is used to find all the groups for a given username.

If you already have two tables that contain this information, you can use them directly. For greater flexibility, you can also define database views for the JDBCRealm.

To create views, edit your create_db.sql file and create two new views:

create view jdbcrealm_user (username, password) as
select username, password
from account;

create view jdbcrealm_group (username, groupname) as
select username, 'Users'
from account;

A database view acts like a table but the rows of the table are retrieved according to the underlying tables. You can test a views by running an SQL queries against it:

select * from jdbcrealm_user

The jdbcrealm_group is a simple view that associates every username with a group called "Users".

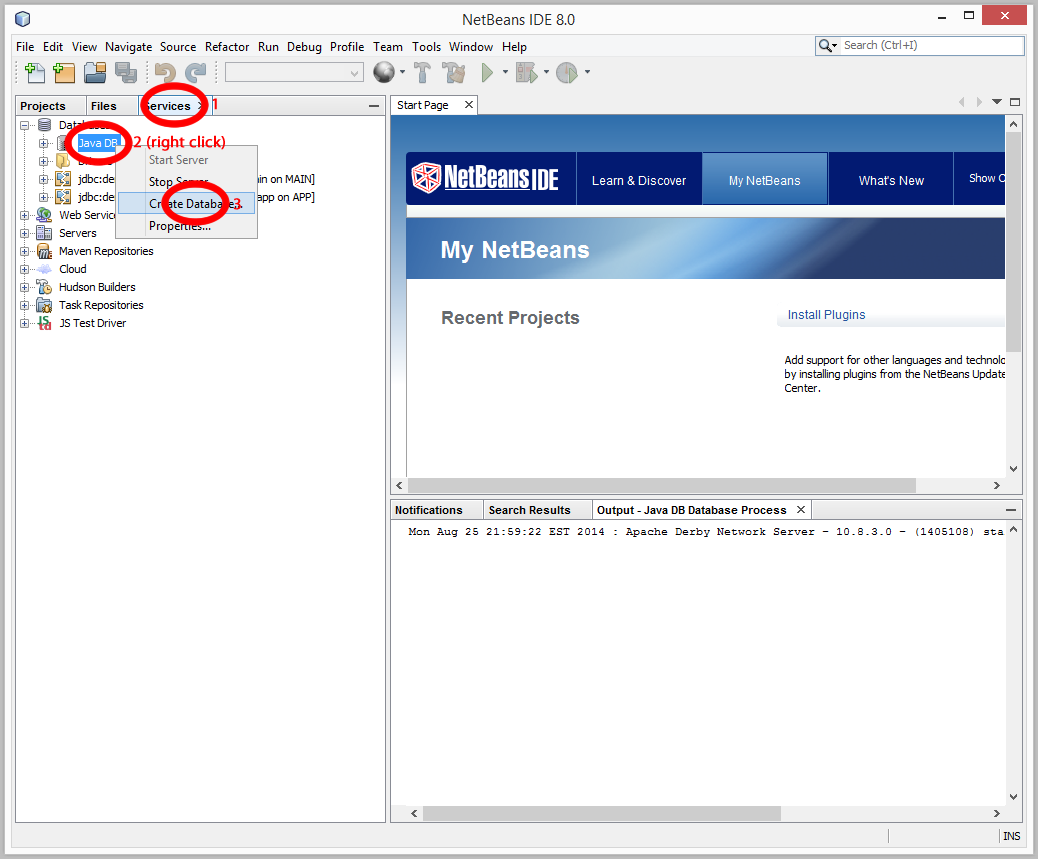
Configure JDBC Realm

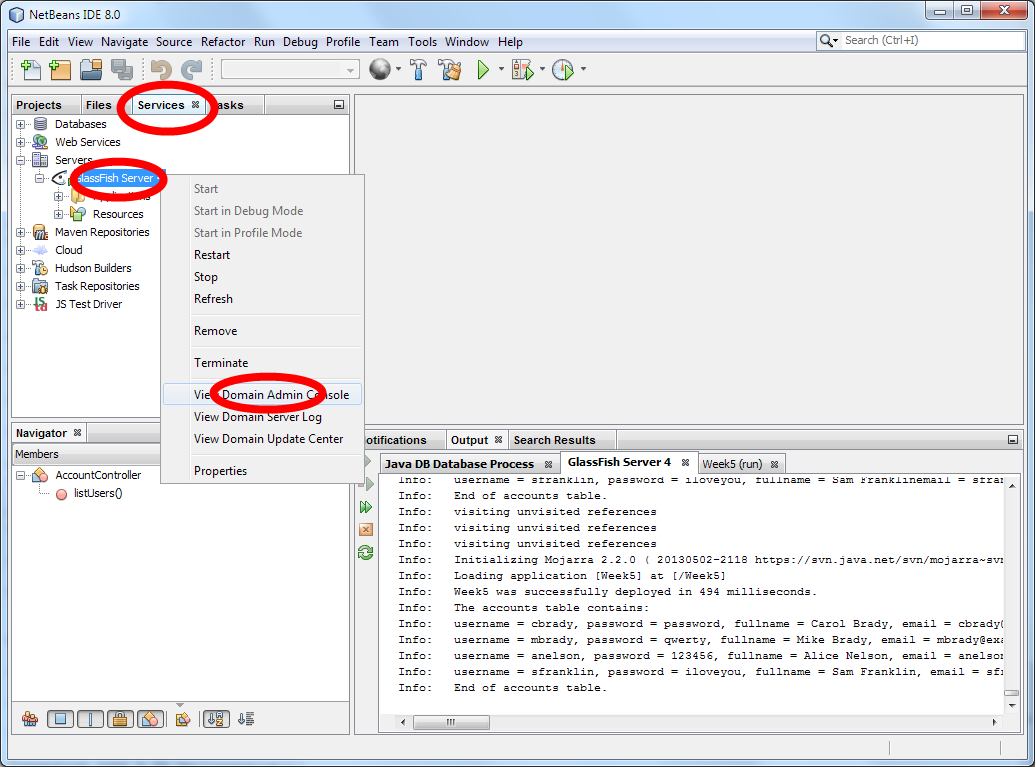
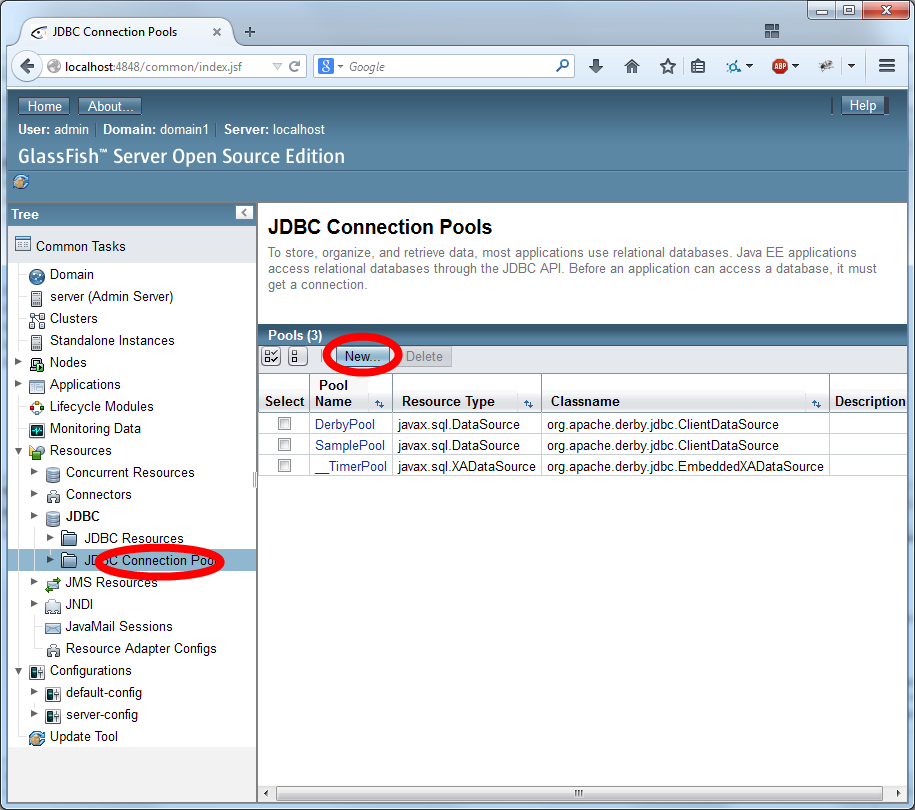
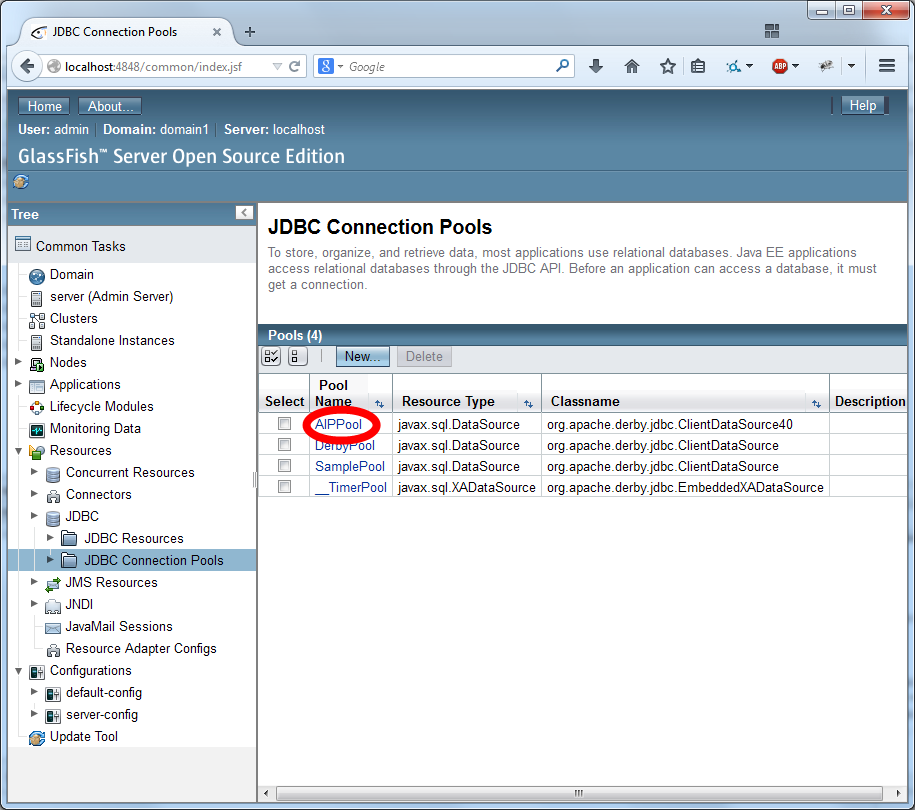
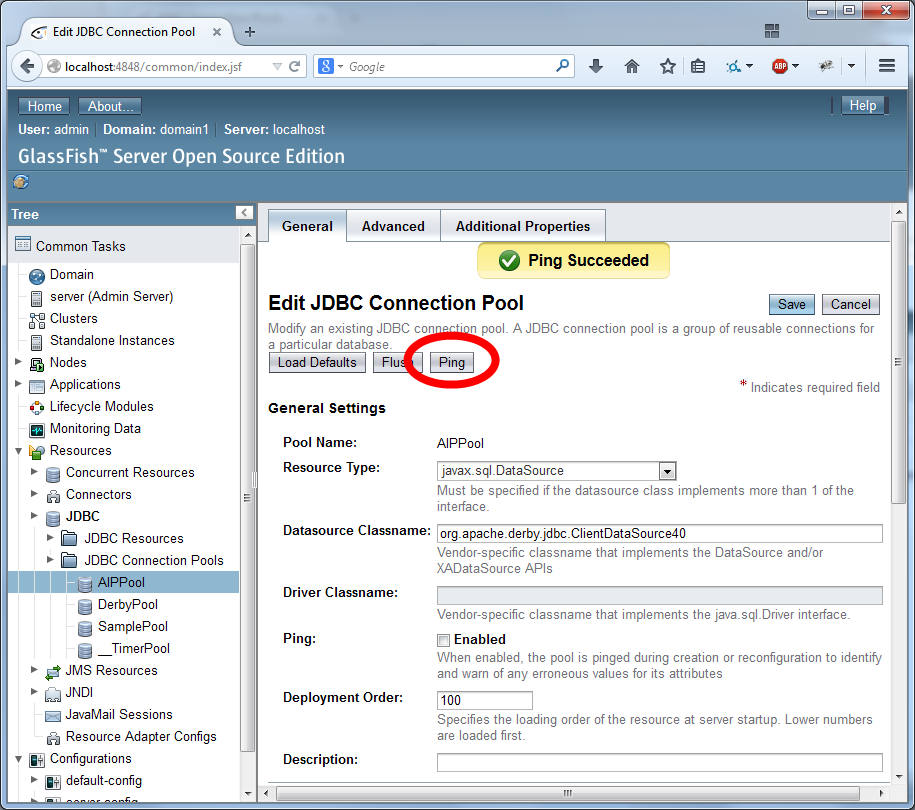
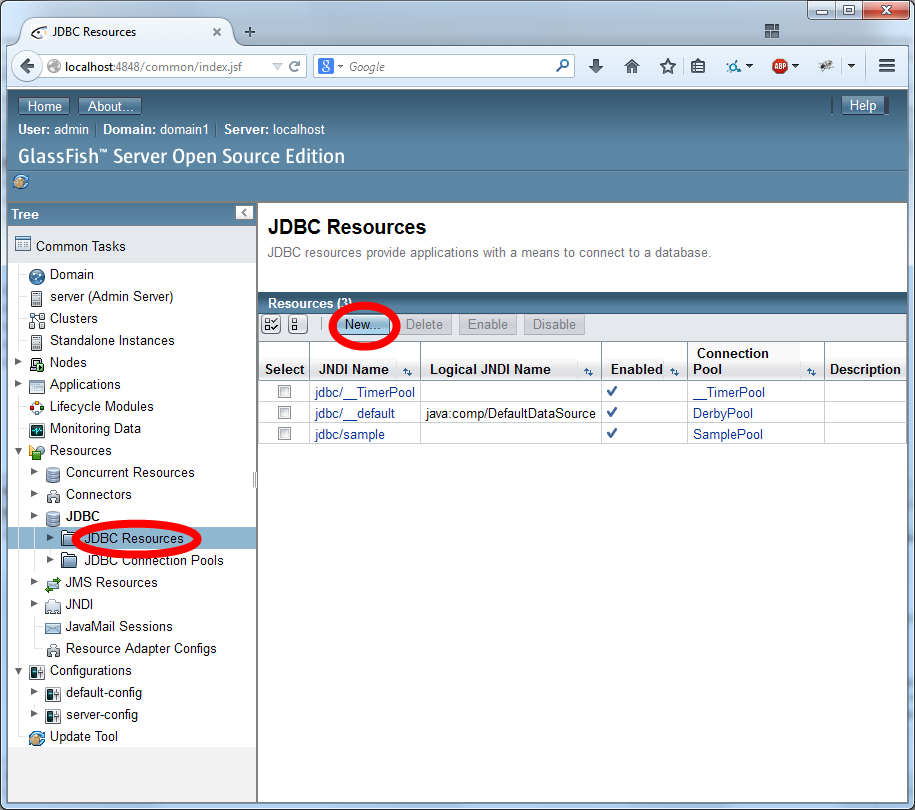
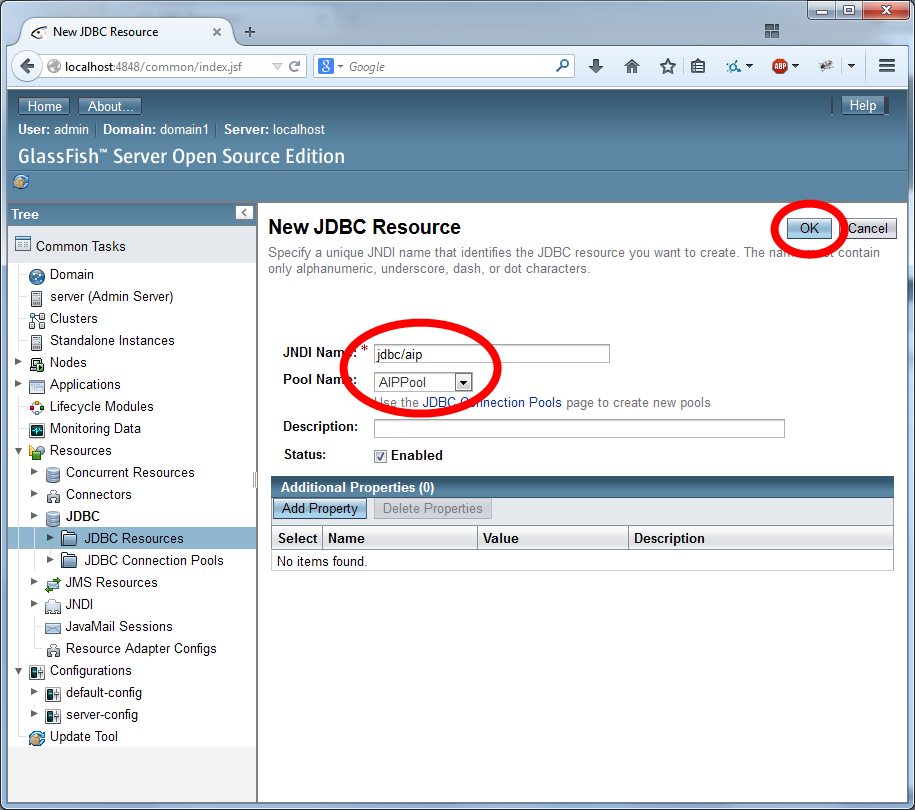
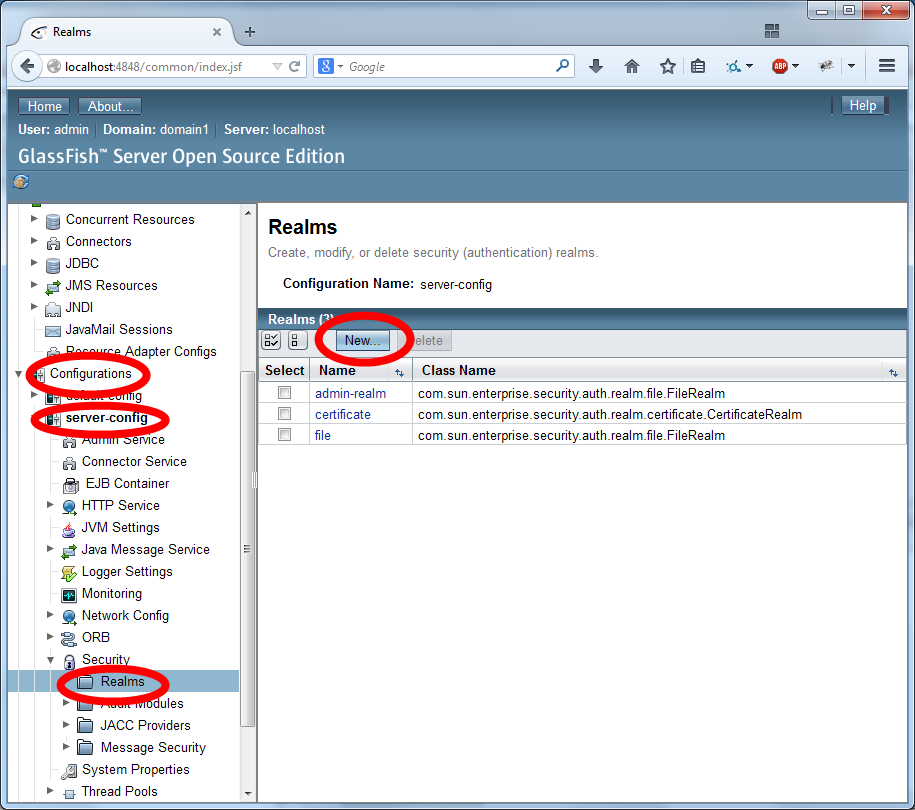
The JDBC Realm is configured in the GlassFish Server Administration Console.

Navigate to the "Configurations/server-config/Security/Realms" section of the menu. Create a new realm.

New realm

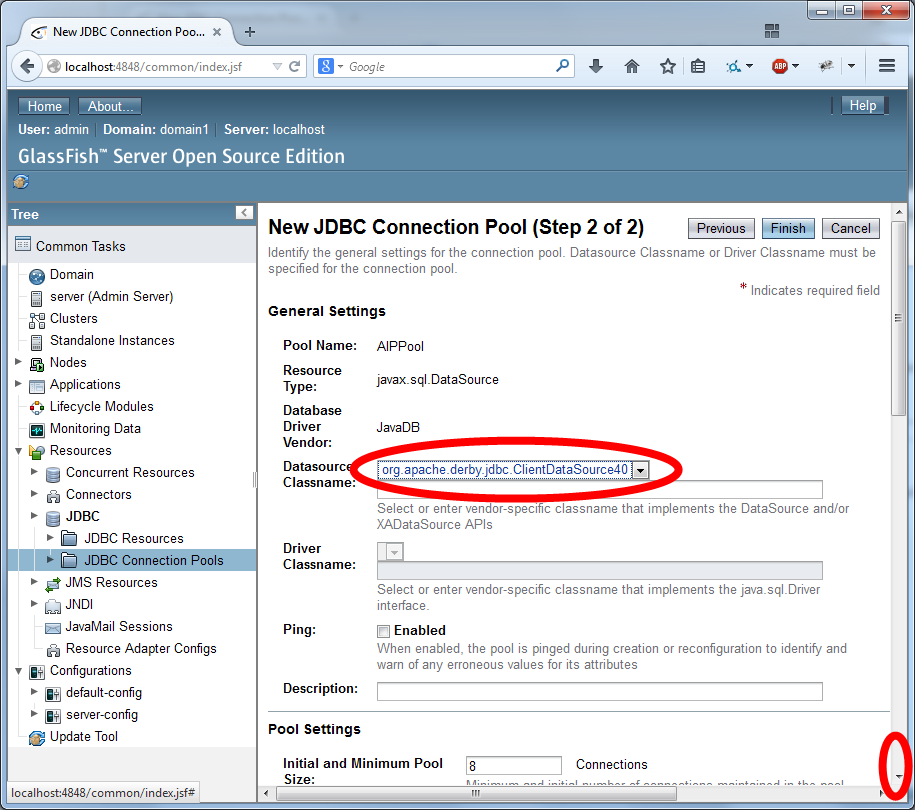
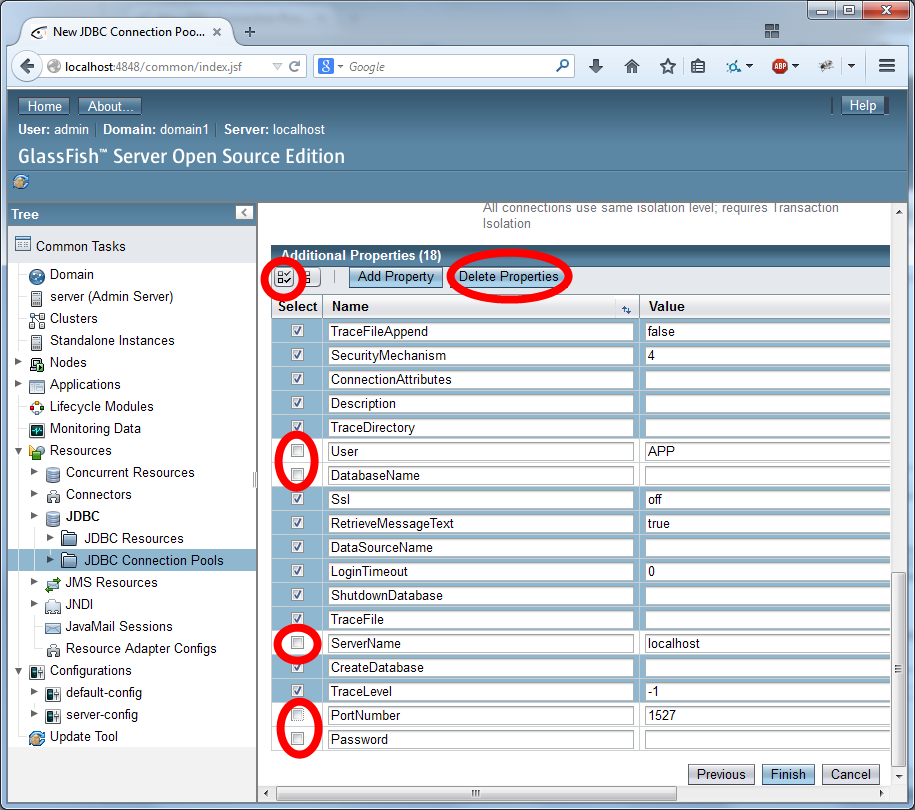
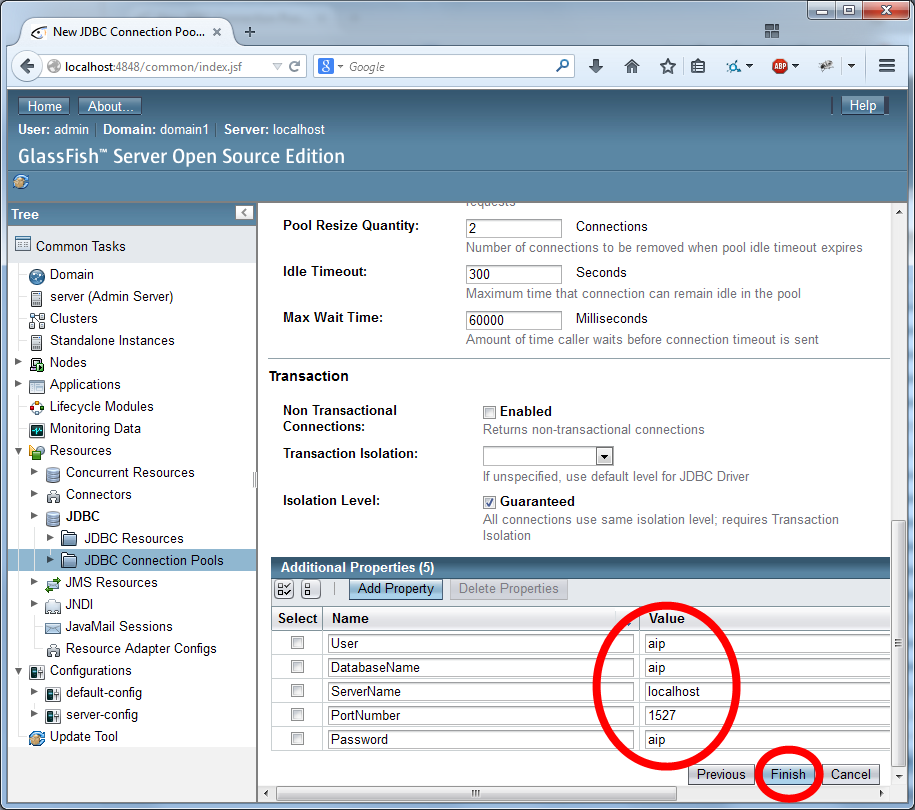
Name the realm "aipRealm" (without the quotes) and use the class name com.sun.enterprise.security.auth.realm.jdbc.JDBCRealm. Then scroll down.

Realm name

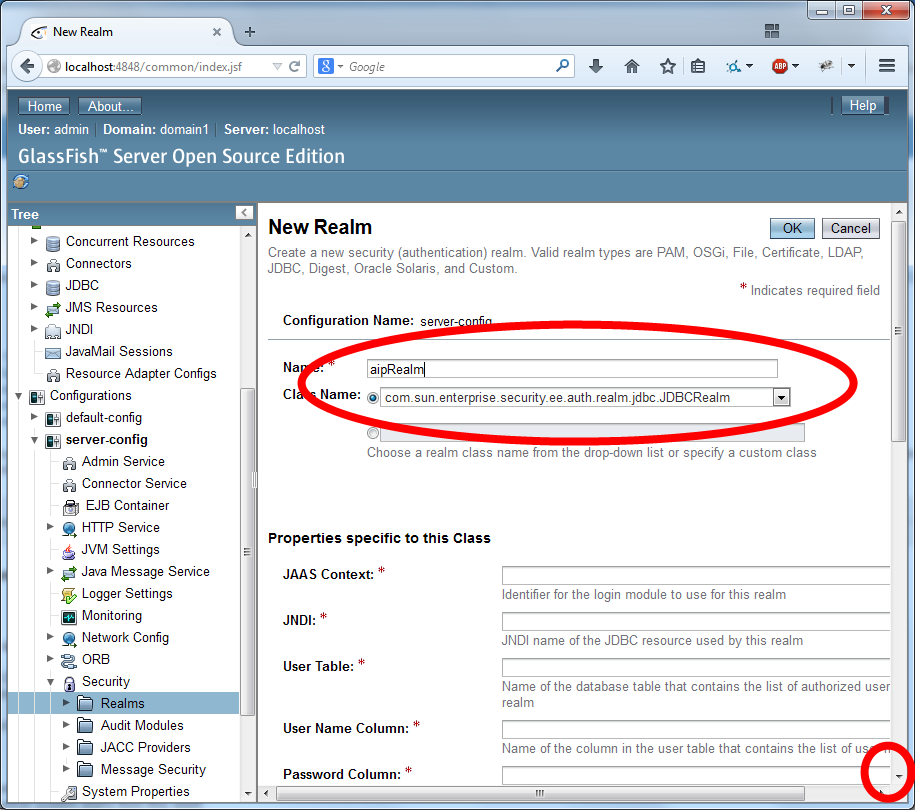
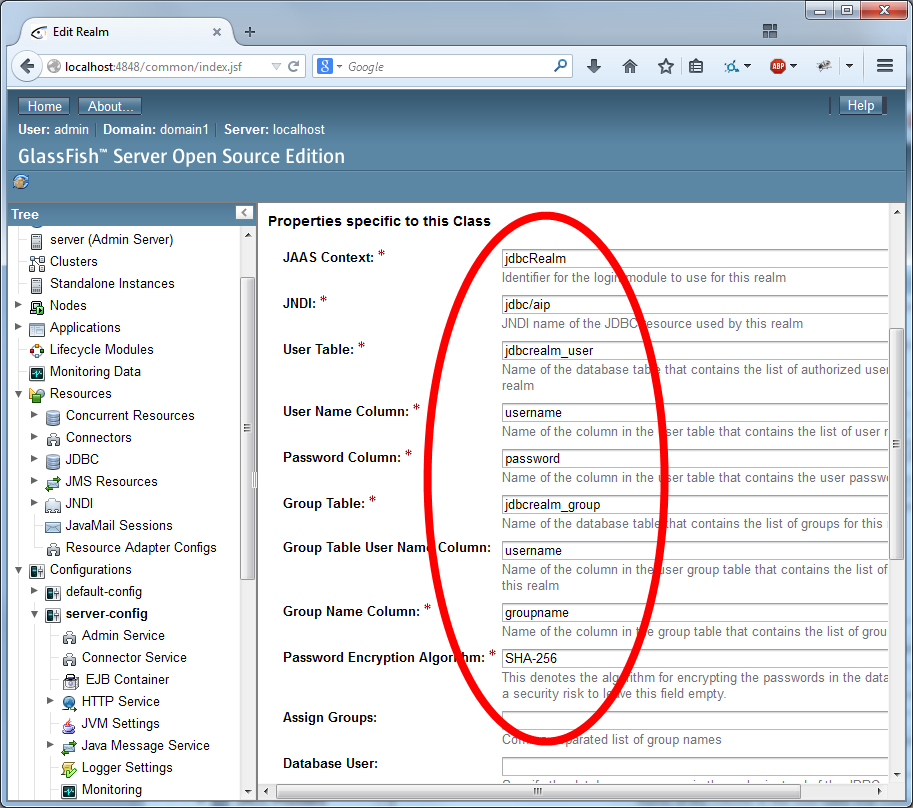
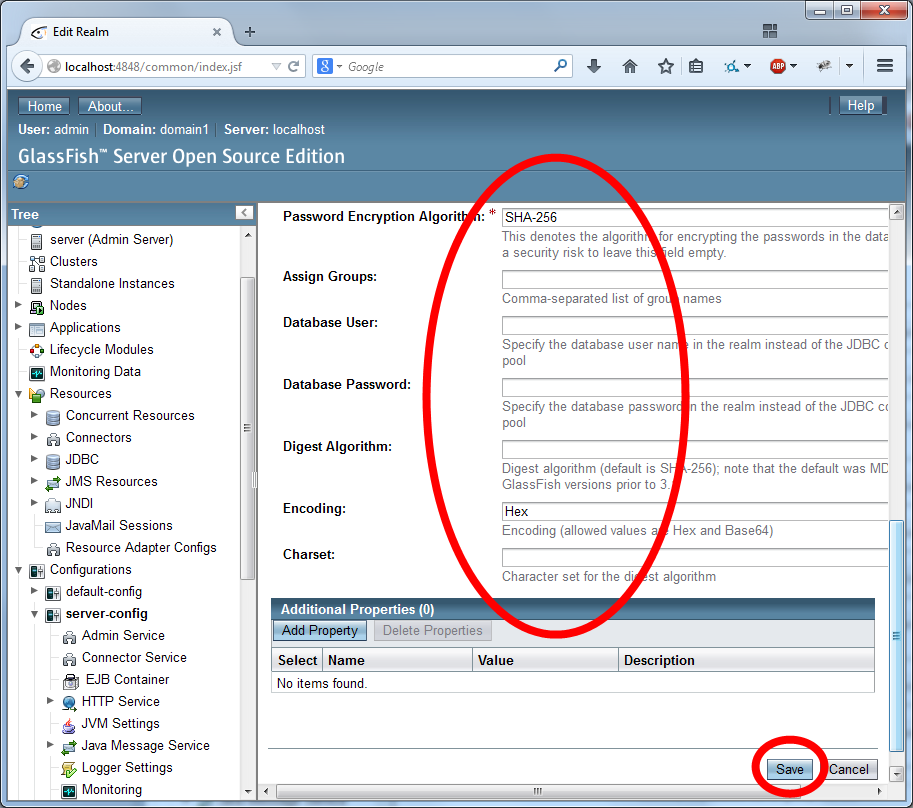
Configure the security using the settings as depicted in the two images below:

New realm

New realm

Use the JDBC Realm

Next, you need to configure your Week5 project to use the JDBC Realm.

First, add a new file of type "GlassFish Descriptor" from the category "GlassFish". Use the default name and file location. If an error occurs while creating the file, you can ignore it.

Double click on the file to edit it. At the top of the editor panel, there is the option to switch to different views. Click on XML to switch to the XML view. Add the following tag to the XML document:

<security-role-mapping>
  <role-name>Users</role-name>
  <group-name>Users</group-name>
</security-role-mapping>

This tag tells GlassFish to map the group of users named "Users" into a role named "Users".

Your complete sun-web.xml file should now look something like this:

<?xml version="1.0" encoding="UTF-8"?>
<!DOCTYPE sun-web-app PUBLIC "-//Sun Microsystems, Inc.//DTD GlassFish Application Server 3.0 Servlet 3.0//EN" "http://www.sun.com/software/appserver/dtds/sun-web-app_3_0-0.dtd">
<sun-web-app error-url="">
  <security-role-mapping>
    <role-name>Users</role-name>
    <group-name>Users</group-name>
  </security-role-mapping>
  <class-loader delegate="true"/>
  <jsp-config>
    <property name="keepgenerated" value="true">
      <description>Keep a copy of the generated servlet class' java code.</description>
    </property>
  </jsp-config>
</sun-web-app>

Now, edit the source of your web.xml file. Add the following configuration elements to the file:

<login-config>
    <auth-method>FORM</auth-method>
    <realm-name>aipRealm</realm-name>
    <form-login-config>
        <form-login-page>/faces/login.xhtml</form-login-page>
        <form-error-page>/faces/login.xhtml</form-error-page>
    </form-login-config>
</login-config>

<security-constraint>
    <display-name>Logged in pages</display-name>
    <web-resource-collection>
        <web-resource-name>secure</web-resource-name>
        <url-pattern>/faces/welcome.xhtml</url-pattern>
        <url-pattern>/faces/secret/*</url-pattern>
    </web-resource-collection>
    <auth-constraint>
        <role-name>Users</role-name>
    </auth-constraint>
</security-constraint>

<security-role>
    <description>Logged in Users</description>
    <role-name>Users</role-name>
</security-role>

The first tag, <login-config>, tells GlassFish that login should use a HTML form (rather than browser-based authentication). It also configures the page that users are redirected to if they need to log in.

The <security-constraint> tag is used to tell GlassFish which resources can be used by which users (roles). We have secured welcome.xhtml and everything in the /secret/ directory.

The <security-role> tag declares the names of the roles that will be used by the application.

After modifying the source of the XML file, save the file. Then you can switch to the Security tab on the XML editor. The Security tab provides a visual way of configuring the same settings (but be careful, sometimes it can be buggy so it always pays to double check the generated XML).

Now, run your application once again. Attempt to access the welcome.xhtml page directly. You should be redirected back to the login.xhtml page.

Integrating with Container Managed

You can now use the container-based authentication to replace your hand-created login code.

You can get the container to do authentication by calling login on the HttpServletRequest.

To log in:

FacesContext context = FacesContext.getCurrentInstance();
HttpServletRequest request = (HttpServletRequest)context.getExternalContext().getRequest();
try {
    request.login(username, password);
} catch (ServletException e) {
    // (you could also log the exception to the server log)
    context.addMessage(null, new FacesMessage(e.getMessage()));
    return null;
}
return "welcome";

}

To log out:

FacesContext context = FacesContext.getCurrentInstance();
HttpServletRequest request = (HttpServletRequest)context.getExternalContext().getRequest();
try {
    request.logout();
} catch (ServletException e) {
    // (you could also log the exception to the server log)
    context.addMessage(null, new FacesMessage(e.getMessage()));
}

}

Modify your login code to use container-based authentication. When you first test your code, it will find that it does not accept any passwords.

This is a security feature of GlassFish. GlassFish does not allow you to store passwords in plain text in the database. In fact, it is generally considered bad practice to store passwords in plain text in any application. Instead, passwords should be encrypted.

We have configured GlassFish to use SHA-256 encryption. You can use this website to manually encrypt a password: http://www.movable-type.co.uk/scripts/sha256.html

To get container-managed encryption to work, you should update your database tables. You should manually encrypt each password and save it in the account database table. For example, the password "qwerty" is encrypted to "65e84be33532fb784c48129675f9eff3a682b27168c0ea744b2cf58ee02337c5".

The next stage in working with authentication is to write a form to create an account. When you save the new account, it should encrypts the password that it stores in the database.

You can use this Java code to convert a password to an encrypted password (the code comes from https://gist.github.com/avilches/750151):

import java.security.*;
public class Sha {
  public static String hash256(String data) throws NoSuchAlgorithmException {
    MessageDigest md = MessageDigest.getInstance("SHA-256");
    md.update(data.getBytes());
    return bytesToHex(md.digest());
  }
  public static String bytesToHex(byte[] bytes) {
    StringBuffer result = new StringBuffer();
    for (byte byt : bytes) {
      result.append(Integer.toString((byt & 0xff) + 0x100, 16).substring(1));
    }
    return result.toString();
  }
}

You can now:

  1. Add methods to your DAO to create an account.
  2. Create a JSF form for creating an account.
  3. Use the JSF form to create a DTO, encrypt the password and save it in the database.